coolwolf / 16/03/2013

WordPress’te güncelleme yaptığınızda klasör silme hatası

For english look here
Eğer wordpress’te tema güncelleme, eklenti güncelleme yada başka bir dosya işlemi yaptığınızda hata alıyorsanız.
Fakat 30 dakika beklediğinizde işlemi yapabiliyor hale geliyorsanız.
Bu süre içinde baktığınızda sildiğiniz klasörlerin hala silinmemiş olduğunu görüyorsanız 2 çözümünüz var.
1. Wincache eklentisini devre dışı bırakmak.
2. PHP’nin wincache eklentisini güncellemek:

Wincache eklentisini güncellemek için aşağıdaki adımları uygulayınız.
Öncelikle bu http://www.iis.net/downloads/microsoft/wincache-extension siteden wincache eklentisinin son sürümünü indiriniz.
Ardından php_wincache.dll dosyasını PHP eklentilerinizin olduğu dizine kopyalayınız.

English :
If you use wordpress and if you recevice error when update themes or plugins.
If you can do this update after 30 minutes.
In this time when you look at deleted folder you see your folders are not deleted ?
Then you have a problem with PHP extension Wincache.
There are 2 solutions :
1. Disable the winchache extension.
2. Download new version of wincache extension from here http://www.iis.net/downloads/microsoft/wincache-extension and copy php_wincache.dll to your PHP extension directory.

coolwolf / 16/03/2013

Obfuscators (code encryptors) for .net

obfuscate
Because of dotfuscator coming with visual studio gives very entry level !protection, i had to use another obfuscator.
A few months ago i had maked a little google search. then i found Eazfuscator. It was enough for a singe developer like me. But in time Eazfuscator become commercial and i had to stop encrypting my software publications. It was not a big problem because most of my software has local install source.
But last week i had to distribute a software on my web site. For some reasons i can not share its source code. So the solution is to obfuscate (encrypt) the code. So i started again to found a replacement for eazfuscator.
Here i will share my experiments.
1. Eazfuscator  ($399):
Ofcourse my first try was eazfuscator. Because it is very easy to use it. You just install it. Then drag solution into eazfuscator’s green area. That’s all. Whenever you build and publish your project it will be obfuscated. You do not have to do additional steps.
It is not very expensive. $399 is acceptible price. I decide to use it in trial period (30 days) and then buy it. But when i install and use the eazfuscator, it show me “builded applciation will not work after 7 days”. I can not buy it in 7 days. In this step i continue my research for alternative obfuscator.
2. Orange Heap (free):
I heard it before. Download and installation was easy. After that it show me a screen. You choose the source and destionaton folder. As i understand after that the applciation obfuscate the executables and puts in the output folder. In comparison to eazfuscator it is not easy for me. I am using clickonce to publish my applications. So i rght click on my solutions in visual studio and choose publish. This is the way i publish my applicastions. When using eazfuscator i do not have to do additional steps. With orange heap i have to create executables first. Then use another installer than clickonce and also another than visual studio installer project. You can use install project in visual studio. But you have to configure the installer project. Ofcours i make a search on the google. May be another one think this is not easy and made a tutorial how to use orange heap with visual studio. But no success. I read the help file in pdf format (it is included with installation). There are good samples. But there is no information about how to integrate with visual studio. At he end i decide to do not use orange heap. When i use another installer orange heap will be my choice.
3. NToolbox Yano (free):
No visual studio integration.
4. The Enigma Protector ($149):
No visual studio integration.
5. Phoenix Protector (free) :
No Visual Studio integration.
6. ILProtector (free) :
From these address add the following code to your post build event. Do not forgot: it will protect only RELEASE builds. Debug builds will not be protected.
On 32 bit windows :

if /I "$(ConfigurationName)" == "Release" "c:\Program Files\VgrSoft\ILProtector\ILProtector.exe" "$(TargetPath)" -nologo

On 64 Windows :

if /I "$(ConfigurationName)" == "Release" "c:\Program Files (x86)\VgrSoft\ILProtector\ILProtector.exe" "$(TargetPath)" -nologo

I have another obfuscators to try. I will share my expreiences here. If you have anything to add to this post, please be free. Just specify in the comment, i will ad your suggestion to this post.
Decompilers (reflectors) i used to try opening obfuscated source code :
ILsPy
JustDecompile
Red Gate reflector (trial)
.

coolwolf / 11/01/2013

Sql Server 2012 Database Mail Konfigürasyonu

Sql Server’ınızda mail ayarları yapıp sistemin size :
Yedekleme tamamlandığında ;
Yedekleme tamamlanamadığında ;
Hata oluştuğunda;
Log dosyaları dolduğunda;
Sistem belirlediğiniz bir yükün üzerinde çıktığında size mail atmasını istiyorsanız aşağıdaki adımları izleyebilirsiniz.
Öncelikle Management kısmında Database Mail üstüne sağ tıklayıp Configure Database Mail tıklıyoruz.
21
Sonraki ekrana next deyip geçiyoruz.
22
Bir sonraki ekranda en üstteki seçeneği işaretliyoruz. Daha sonra bu ayarları değiştirmek için Manage Database Mail Accounts and profiles seçeneğini kullanabilirsiniz.
23
Çıkan ekranda SMTP server bilgilerimizi yazıyoruz.25
Bu ekranda eposta hesaplarımızı ekliyoruz.
24
Default Profile kısmını Yes yapıp bu hesabı her işlemde kullanabilmemizi sağlıyoruz.
26
Bu ekranda bir değişiklik yapmadan devam ediyoruz.
27
Finish diyerek işlemi bitiriyoruz.
28
Bu ekranı gördüğümüzde işlem tamamlanmıştır.

Şimdi sisteme oluşturduğumuz profili kullanmasını söyleyelim.
Sql Server Agent’e sağ tıklayıp Properties diyoruz.

Burada Alert System’i seçiyoruz. Enable mail profile seçeneğini işaretliyoruz. Profil olarak da oluşturduğumuz profili seçiyoruz.

OK tuşuna basıp ekranı kapattıktan sonra, SQL Server Agent altındaki Operators seçeneğine sağ tıklayıp New Operator diyoruz.

Operatörümüzün bilgilerini girip OK butonuna tıklıyoruz.

Bu operatöre neleri bildireceğimizi bu ekrandan seçiyoruz.

Şimdi sıra geldi yedekleme planımıza mail atmasını söylemeye. Jobs altındaki yedekleme işimize sağ tıklayıp Properties diyoruz.

Çıkan ekranda Notifications seçeneğine gelip E-Mail’i işaretliyoruz. Karşısından operatörü ve ne zaman mail atmasını istediğimizi işaretliyoruz.

OK butonuna bastıktan sonra işlemimiz tamamlanmış olacaktır.
Hatasız yedeklemeler dilerim 🙂

coolwolf / 11/01/2013

Sql Server 2012 Otomatik Yedekleme

Sql Server 2012 ile veritabanınızın yedeklerini otomatik olarak almak istiyorsanız alttaki adımları izleyiniz.
Önce Sql Server Management Studio’yu açıp Sql Server Agent‘in çalıştığından emin olun. Yedekleme için Sql Server Agent gereklidir.

Eğer SQL Server Agent’in çalışıtüına emin isek bir sonraki adıma geçebiliriz.
Management altındaki Maintenace Plans’a sağ tıklayıp Maintenance Plan Wizard’ı seçiyoruz.


Çıkan ekrana next diyerek devam ediyoruz.

Bu adımda maintenance planımıza bir isim vermemiz gerekiyor.
Change butonuna bakarak yedekleme planımızın ne zamanlar çalışacağını belirtiyoruz.

Change butonuna bastıktan sonra alttaki ekranı kullanarak zamanlamamızı ayarlıyoruz.
İşimizi bitirdikten sonra ok butonuna basıyoruz.

Next düğmesine bastıktan sonra maintenance planımızın ne çeşit bir plan olduğunu belirtiyoruz. Bizim örneğimizde Backup Database.

Eğer birden fazla seçenek işaretlediysek bu işlemlerin hangi sırada yapılacağını seçiyoruz.

Bir sonraki ekranda Databases kısmına Specific databases seçip, Database karşısındaki … butonuna basarak hangi veritabanının yedekleneceğini seçiyoruz. Ardından add butonuna basarak yedeklerimizin nereye kopyalanacağını seçiyoruz.

Bu ekranda next deyip devam ediyoruz.

Alttaki ekran son ekranımız. bu aşamadan sonra işlemimizi tamamlamış oluyoruz.

Alttaki gibi bir ekran görüyorsanız işlemler tamamlanmış demektir.

Yedek aldıktan sonra sistemin size mail atmasını istiyorsanız ilgili yazımızdan destek alabilirsiniz.

coolwolf / 30/11/2012

SoundCloud sitesindeki bir parçayı indirmek

Bu adrese girin çerçeve içindeki kutucuğa soundcloud daki parçanın linkini yapıştırıp OFF düğmesine tıklayın.
“Right Click…” yazan yere sağ tuşa tıklayıp “Hedefi Farklı Kaydet” seçeneği ile dosyayı mp3 olarak istediğiniz yere kaydedin.
Siteyi yapana teşekkürler 🙂soundcloud

coolwolf / 29/11/2012

Microsoft Windows Server 2008 R2 Etki Alanı Adını Değiştirmek

Windows-Server-2008-R2Domain Adını değiştirmek için
rendom /list
oluşan xml dosyasında şu anki domain adının olduğu yerleri değiştirin.
rendom /showforest
rendom /upload
rendom /prepare
rendom /execute

Son olarak GPFIXUP komutunu çalıştırdıktan sonra olay tamamdır.
Sunucuyu kapatıp açın. Ne olur ne olmaz.

coolwolf / 29/11/2012

Microsoft Windows Server 2008 R2 VPN

“Network Policy and Access Services” Rolü eklenir.

Bir sonraki ekranda Next diyerek alttaki ekrana geçiyoruz.
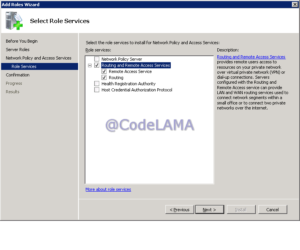
Burada sadece “Routing and remote access services” kutucuğunu ve onun altındakileri işaretliyoruz.
Ardından Next ve install diyerek kurulumu tamamlıyoruz.

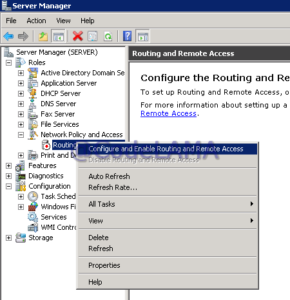
Şimdi Kurduğumuz Rolü yapılandırıyoruz. Bunun için sol tarafta beliren “Network Policy And Access Services” grubunun altındaki “Routing and Remote Access” seçeneğine sağ tıklayarak en üssteki “Configure and Enable Routing and Remote Access” seçeneğini tıklıyoruz.

Çıkan ekrana Next diyerek alttaki pencereye geliyoruz.
Burada en üstteki Dial-Up or VPN seçeneğini işaretliyoruz.

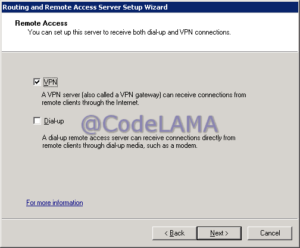
Bir sonraki pencerede sadece VPN seçeneğini işaretliyoruz.

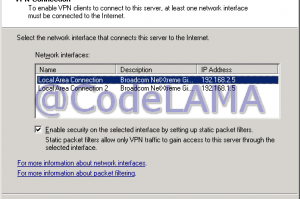
Bir sonraki ekranda sunucumuzu internete bağlayan ethernet kartını seçiyoruz.

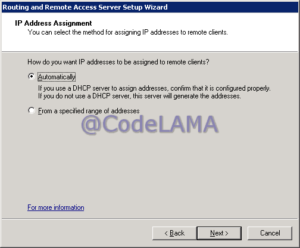
Bir sonraki ekranda VPN ile bağlanan kullanıcılarımıza IP adreslerinin nasıl verileceğini işaretliyoruz. Bizim ağımızda DHCP sunucusu VPN kurduğumuz sunucunun kendisi olduğu için otomatik seçeneğini işaretliyoruz.

Radius kullanmadığımız için bir sonraki seçeneği Next ile geçiyoruz.

Artık VPN sunucumuz hazır. Tek yapmamız gereken VPN ile bağlanmasını istediğimiz kullanıcılarımza bu yetkiyi vermek.


coolwolf / 29/10/2012

ÜberSVN vs. RocketSVN vs. Collabnet Subversion Edge vs. VisualSVN

I first use ÜberSVN but i see its tomcat server uses 1.5GB of ram.
After that i decide to try another free svn server on windows platform.
First i try RocketSVN.

It is easy to install. But its Visual Studio plugin is not wiroking with VS2012. This may be not so importand. But the software isn’t updated more than a year.
RocketSVN gives you access to source code. But there are just 2 developers. (May be they dont have time and we have to help them)
So i decide to not trust this.
 
 
Second i try to install Subversion Edge:
It is very easy to install. Well updated. I can trust this software.
My first attempts to install Subversion Edge ends with a strange java error.
After a little work i see the error is something like “topupper” function. Because java tries to make upper initParams and it becomes to İnitParams. My region settings are set to Turkish language. And in Turkish upper i is İ. The İ letter is not equal to I letter. This is why i see this error. So solution was very easy. I just edit the file D:\csvn\appserver\contexts\csvn.xml and change initParams to InitParams. Then the error goes away.
But when i create users and repositories i see there is no access control system.
I mean creating groups and users. Then give access permission to repositories.
Subversion Edge does than with TeamForge. TeamForge is free tor up to 10 users.
But my dont want to use any limited software. We are a small team with just 2 developers.
So this group and user management point make me uninstall this software.
Now lets try to install VisualSVN Server Standard Edition:
The basic configurations was like this: 
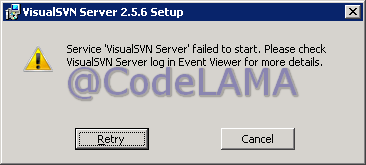
At the end of installation i see this screen (this is the same screen which i see in my previous attempts to install VisualSVN Server).

When i look at the Event Viewer i see this error: The VisualSVN Server service terminated with service-specific error Incorrect function..
After a few hour work i found this: changing the service account to local service account solver the problem. Now lets try the software.